

Well I�m finally getting to the end of the list. The last section covers the off road equipment. This category is what gives the article it�s name �Not your standard RV???.
4X4 Options:
(Click on smaller images to enlarge)
This is where the road splits between a camper van and an off road vehicle. There are highly debated pro and cons to all of the options in this section. In general the largest con is the all mighty dollar. Forking out the kind of cash it takes to build a four wheel drive vehicle takes a well thought out commitment. I described this in more detail toward the starting of this article (parts 1, 2 and 3). I listed several companies other than Sportsmobile who build four wheel drive RV�s that range anywhere from mild to aggressive. Much of this has to do with what you really need while off roading. It wouldn�t be a good investment to purchase a rock crawling monster when all you plan to do is visit paved campgrounds. A mild four wheel drive or all wheel drive RV might be a better choice especially if all you really need it for is to keep from chaining up in snow. And although Sportsmobile makes 2WD or mild 4WD versions well suited for many people, there are several other companies that offer RV�s which are larger and more comfortable vehicles than a typical van. My recommendation is to rent a vehicle similar to a Sportsmobile and make sure its size will fit your needs. Any thoughts like �it seems kind of small??? should be examined and this is where renting a class B van conversion comes in. Besides getting the feel of what it�s like while traveling, you might find something that will compel you to tweak your order if a SMB is your choice. Then get out and do some off roading. I�ve already said this but I�ll say it again, �it really doesn�t matter what type of 4X4 you use to see if it�s a hobby you�ll enjoy???. I have been participating in light to medium off roading since 1979. Back then I really never tried any rock crawling and didn�t plan to do any in the future. So when I felt it was time to consider my commitment to buy a modern off road rig, I thought I finally found the ultimate off road vehicle. An EarthRoamer! Yep, I sure wanted one, but it would have been a big mistake. I�m not degrading the EarthRoamer rigs in any way. Mainly it was overall cost and the fact they were based out of Colorado that detoured me toward Sportsmobile West of Fresno, a company 90 miles away from my home. At the start of my order, cost was a huge factor, but the more I looked into what I wanted, I felt it would be a good idea to purchase a van that was more suited toward the heavy end of off roading. EarthRoamer�s are capable 4×4�s but they are tall which would keep me out of the areas I intended to visit. The funny thing was I didn�t know is how light weight rock crawling would become a strong interest to me. It circles back to what I eluded to earlier; take the time to plan it out and hopefully you�ll get what you want or more important, what you need. Don�t run out and spend big buck hoping that you will start to enjoy something you know nothing about. I am so glad I didn�t make a high dollar mistake by purchasing a vehicle that wasn�t what I needed. EarthRoamer�s are fantastic vehicles, just not suited for the off roading I do.
Picking the four wheel drive system isn�t really much different. There were a few choices offered to me when I ordered. The two main choices given to me by SMB were the Quigley conversion and Sportsmobile�s own engineered design conversion. As mentioned before, another choice is to have SMB build the camper portion and then have another company do the 4WD system.
When it comes to suspension, the 08 Ford vans are a new breed. They sit higher and use Ford 450 brake systems so there is no need to upgrade the brakes which is the best SMB improvement I have seen yet. The vans can also be outfitted with taller tires reducing heavy body contact while in a tight turn or driving in and out of a rut. I don�t want to get into a debate between Quigley and Sportsmobile designs but will say SMB is slightly more heavy duty and cost more. Both companies are improving on a continuous basis so what I requested may be a thing of the past. I plan to go over what I opted for but will try to go over the newer vehicles as well. In the real world several items require some thought no matter what lift design you go with. These vans are heavy, so the terrain you plan to run it in must come into play. I�ve seen Quigley conversions that could out perform my rig, but those Quigley�s weighed a fraction of my 10,500 pound behemoth. Another important factor is a few off road companies who build conversions may use all Ford parts unlike SMB who uses Quigley or non Ford parts that are specifically designed for their conversions. This is sometimes used as a selling point wherein some conversion companies claim that any Ford dealership will have the knowledge and parts at hand to make a repair.
All options listed on the build sheet include the price of the item and installation fees. That�s why a $50 microwave lists as 200 bucks on the build sheet. SMB has to wire it, add an outlet and secure it so it can handle rough roads. The 4×4 system is no different. The price list for the conversions are shown towards the bottom of the build sheet, but because I�m already discussing the 4×4 system, here�s the 2006 price installed.
SMB conversion set me back $13,890.00�.ouch!
The Quigley would have cost me slightly less coming in at $9,719.00.
In 2008 the price list increased to $16,400 for a SMB conversion while the Quigley was bumped up to $10,970. Looking back, it seems that maybe I got a deal�ya think? Not really. 2008 was the first year that Ford made major cosmetic and design changes to the Econoline series which hadn�t been done for several years. I�m starting to accept the cosmetic changes finally, but I wished from day one I had some of the design changes that were made to the drive train alone in the 08 models. Upgrading the brake system on my 2006 to what is offered on the 2008 series would cost me close to four grand. Of course I didn�t have a clue that the 08�s would have a better braking system. For most people, this would be more of an issue when purchasing a used vehicle today.

Sorry, but I feel the earlier vans look better, but the newer vehicles have some nice upgrades. I�ll discuss the brake upgrade below and touch on other drive train improvements as well. As far as the 2008 cosmetic changes that Aluminess has made, the new design makes a huge difference on the looks as shown in the image above and below.


The 4×4 section starts off with the Trojan equipment line offered by Aluminess of California.
Aluminess is able custom build almost any heavy duty aluminum product you can think of. Some people choose manufactured goods from companies like ARB or Warn. That�s up to the customer. SMB can install most anything you order but I was really taken by the Aluminess line. Their products are extremely well built, light, and look great IMO.
The front Aluminess bumper:

As seen above, the 08 and newer bumpers were redesigned. The review here is about what was offered in 2006. Contact Aluminess for more information.
First on the list are the bumpers. The aluminum Trojan bumpers are light as compared to other companies that offer versions in steel. The front bumper really adds character to the rig. I think more people notice that than any other item on the van. When I pull up to a stoplight, 9 times out of 10, people look directly at the front bumper. It�s actually very humorous. But the bumper upgrades are very expensive. In 2008 the front Aluminess bumper ran 2,158 bucks and the rear came in at whopping 2,523 dollars. Obviously these options are not for all.
The front bumper has a compartment to hold a standard 12,000 lb warn winch that can be locked up from the public. If a winch is not needed, the compartment helps store equipment such as tools or tire chains. Warn also offers a winch with an air compressor on it but it does restrict some air flow through the radiator plus it�s exposed for all to see rather than being locked up out of view. I have heard some negative reviews about the compressor portion also, so some research should be done before jumping on one of these models. The biggest complaint of the older Ford vans using the Aluminess bumper is the limited air flow to the radiator. I have yet to experience high engine temps but turbo EGT�s and transmission temperatures are an issue. The diesel vans run hot and all the air flow you can get, the better. It might not be as much of an issue with a gas engine.
The 08 and newer vans don�t seem to have near the flow restriction of the older rigs.
Fairlead rollers should be thought over when ordering the front bumper. Synthetic rope is the way to go now days and if you decide to pull the wire rope (cable) off the winch, a fairlead designed for synthetics should be requested at the time of the order. A standard roller type fairlead will work on synthetic rope; you just have to make sure you don�t pinch it. The fairlead is cheap compared to the price of the rope which can cost as much as 600 dollars. I�ll go over this in more detail under the winch section below.

The Aluminess bumper offers twin front shackles as well as cubby holes for fog or other similar sized driving lights. Hi-Lift jack brackets can be added to the front bumper as well but must be special ordered. The bumpers are not bullet proof. I talked with one gentleman who ripped his bumper apart when he was being pulled out of a mud bog. It was covered under the warrantee but according to the owner, the van was out of four wheel drive and they tore up the bumper before he realized the front was disengaged. The fact is that these bumpers can take a lot of abuse but they can be damaged the same as other similar bumpers.
The rear Aluminess bumper:

Most of the rear Trojan bumpers has a two piece swing type gate that holds the spare tire on one side and some sort of storage box on the other if requested. They also have the same type of internal storage box similar to the front bumper just a bit smaller.

As a note, neither the front nor back bumper storage compartments are dust of water proof. Stuff in the back seems to get dirty fast. Strip sealing helps but is not 100% effective.
Weight of what you plan to carry on the gated sections is a major issue. Some improvements, one which I complained about have been addressed over the years.


I had extra hinges added to both sides for extra strength and requested installation of pin type hinge bolts rather than the all thread type bolts that plagued the earlier models. Care must be taken on the tire size so the gate has the clearance to swing shut. Aluminess does make adaptors if one decides to switch to larger tires but it�s best to determine the tire size you plan to run before the bumper is bought and paid for. This is where beefing up the bumper come into play. You should think about shackle points, and decide if you�ll ever want to add a rear winch at anytime in the future as this will require a design change from normal builds. I totally zoned on this when I had my bumper re-designed. And last, I would like some extra tail light exposure. The spare tire and equipment box makes it difficult for those approaching from the rear to see the vans rear lights. All I really want is a small strip of LED lights to be added on each side for a little extra safety. I plan to look into this in the near future and think it might be possible to squeeze something in under the backup lights.
Trojan Tire carrier:
If you want to mount a tire on the stock bumper but don�t want to spend the big bucks for a rear bumper, Aluminess offers a gated tire carrier that bolts up to the existing bumper. Made heavy duty like the Trojan bumper, it costs about 700 dollars. If you plan on the XL storage, it�s just another solution for mounting the spare tire. Standard wheel lug locks bolt up the tire.
Trojan Bumper Boxes:

The standard accessory that comes with the bumper will hold four regular sized Jerry cans. It�s basically a large tray. Many owners, like myself, upgrade to specialized boxes designed to hold a variety of items.


Aluminess can custom design any box to suit one�s needs. The best solution is to pick something that they routinely offer to save confusion on the design.

I plan to have a local company change my custom Aluminess box that didn�t come out quite as I had planned.
Trojan Ladders:

The Trojan ladder is not your typical wimpy RV ladder. These babies are heavy duty and are able to withstand brush, trees, or other obstacles that reach out to clutch at your vehicle. While nothing is indestructible, the Trojan ladder can easily handle a 350 pound person or heavier. Most owners who have installed anything on the roof usually need a way up to load or unload. Myself, I opted for a second ladder making it easy to tie down equipment. Make sure you inspect the ladder to make sure the rungs are level. My first ladder was welded incorrectly and I was told that was normal. It has always bothered me to see a sagging rung but even though I complained, SMB or Aluminess has not made it right. The ladders are slightly expensive around $450 installed.
Hoop Steps:


Hoop steps are a short U-shaped step that allows you to enter the vans side doors. They are a common site on four wheel drive pickup and are an alternative to running boards. A typical running board sets high and is difficult to use with lifted vehicles. Hoop steps hang low enough to help with entry and are usually heavy duty in make, able to withstand light contact with obstacles. Standard manufacture such as Carr can be requested. Other companies make similar steps and single foot hoop steps are the most commonly seen.
Nerf Boards:

Nerf boards and Nerf bar steps are generally longer in length than the hoop step. Some run a full length between the front and rear tires. The boards SMB has used lately are more light weight than the typical Nerf bar and are tucked up slightly higher than a hoop step. This makes it a bit more difficult to climb into the van depending on the lift.

The style that SMB has adopted is prone to damage but because they sit higher than the hoop step, you�ll usually be worried about ripping up something else under the van. But there is always that rouge boulder just waiting to contact any of the steps. I ordered the boards because I prefer the look, but it is a chore climbing into the van (and I�m 6.0�). YMMV.

Another downside of these style of steps is that they are prone to abrasion. Anodized hoop steps probably have the same problem and can be touched up, where a non-coated hoop step will get shinny where constant contact is made.
Off Road High Intensity Lights:
I highly recommend having some kind of auxiliary front lighting. The standard company SMB offers is Hella USA

Hella makes a good product but there are other companies to choose from. The SMB build sheet shows the Hella Ralley 4000 series of lights. Two models are offered; the halogen, and the HID lights. The HID lights are much brighter that the halogen but at about five times the cost I was hesitant about flopping down that kind of cash. I spent slightly over $350 for the halogen series. They have worked well but the new LED technology is very impressive and I�m glad I didn�t spring for the HID�s. Just recently I had SMB install a 42??? LED light bar that has made a huge difference. I�ll discuss the rack and light bar in the next posting.
The main company that I�ve made all of my lighting purchases from exclusively due to their fantastic prices has been Vision Warehouse and although you might be able to find better prices out there, this company has been very fair to me.
Although the light bar required a rack, SMB has become quite adept at mounting smaller racks to hold a variety of different style forward facing lights.
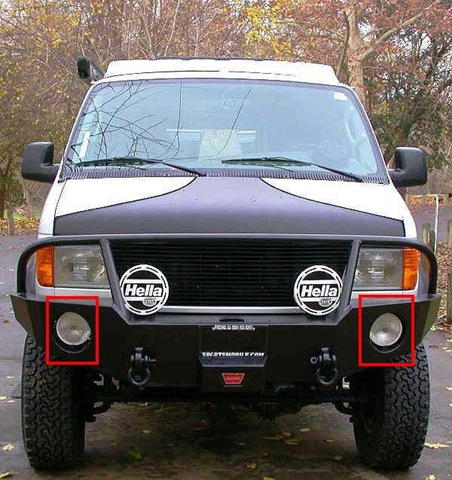
Fog Lights:

The Aluminess bumper was designed around the Hella Fog lights or similar size lights installed in the front bumper. These lights are not driving lights rather what they are�fog lights. They work great in fog, something I�m plagued with in the California central valley. We have some of the worst fog in the world so I would never switch to a brighter type light. But maybe you live where fog is not a problem. Several owners have switched out the fog lights to a brighter light. That�s up to the owner. Driving lights are nice but I�ll keep the fog lights for what they are designed for. I had mine wired to the ignition so I don�t leave them on while exiting the vehicle during daylight hours. The fog lights list at just under $250.
Backup Lights:

The Aluminess rear bumper has cutouts for some kind of backup lights. It seems that Aluminess designed the cutouts around the Hella 550 series flood lights as they are a perfect fit. These lights work great illuminating what you�re backing into. They also can help to light up the area when needed if wired on a separate switch. With today�s LED technology, better lighting might be available but I have no intension of replacing these lights. Unlike many LED lights, the Hella 550�s put out a standard white light that is pleasing to the eye. SMB installed my 550 lights for just under 200 bucks.
Larger 46 Gallon Transfer Flow Fuel Tank:
In 2006 I had no intension of keeping the small standard stock fuel tank. Older builds might have a duel tank option but in 2006 the choice for a larger capacity tank was and still is offered by the Transfer Flow Corporation. I was building a vehicle that needed long range travel between fill ups, so a larger tank was important. Jerry Cans work, but face it, those are used as backup and having to use them is a PITA. On top of that, the Espar diesel heaters pickup tubes are designed to shut down when a quarter tank level is reached. This is for safety so you don�t wake with an empty fuel tank. A quarter tank of fuel is still enough fuel left in most situations to find a service station if it�s a big tank. But being able to travel for long distances without the need to re-fuel was the main issue and the larger the tank has been a good choice. One problem exists with my Transfer Flow tank. I have a difficulty filling the last 5 or 6 gallons. It seems to puke out fuel around the inlet on certain pumps depending on the delivery system of the pump. It�s a major flaw that has ruined my day on several occasions. If fuel spills, not only is it an issue about what�s on the ground, it run down the sides of the van. I don�t mind the smell of diesel, but I can�t sleep smelling it all night. Apparently some of the same year builds similar to mine don�t have the problems I�ve experienced with the fuel spillage, but many owners have brought up the fact that it�s difficult to get the last 10 gallons or so into the tank. My solution is to pump the last few gallons of fuel into the tank slow. There are a few solutions to the Transfer Flow Fuel Tank problems that owners have tackled. I just continue to deal with it. At $1,131 the fuel tanks was expensive but it is a must item to have IMO. I noticed that the newer SMB order sheet does not list an aftermarket tank and I don�t know the reason.
Hellwig Front & Rear Sway Bars:
Sway bars add side stability and traction to the suspension. They are commonly used on street vehicles for high performance handling. On heavier vehicles with stock spring setups they improve cornering and side to side motion on off camber surfaces or even when dealing with high buffeting winds. Most 4×4 builds have heavier designed spring packs that lessen the need for a sway bar. At the time of my build SMB upgraded my rear spring packs and I also had air bags added for towing. My rear axle was upgraded as well so I don�t have any issues with road handling that others might. Some van designs may benefit from adding a sway bar.

Hellwig also makes the front sway bar that is standard with the SMB 4X4 conversion. One of the major differences between the front and (optional) rear sway bar is the front bar can be disconnected which allows the front wheels to articulate down better than a stock vehicle. This also frees up the suspension allowing the spring pack to handle rough roads better which in turn gives you a smoother ride. By pulling the disconnects, the tires will drop much further and stay in better contact with the ground. This is a definite advantage for off roading. Pull the pins, remove the bar and you�re good to go. Reattaching them requires a bit of finesse but is not a real problem once getting used to the procedure.
�CorrecTrack??? Spacers:

These items are metal plates that move the rear tires outward to match the front tires footprint. Similar to a performance enhancing sway bar, increasing the width of the axle by moving the tires out via the spacer helps with side handling. In situations like snow, rear axles that are shorter than the front have to tread through snow that is untouched by the front. These spacers MUST be installed correctly with the correct length studs or studs can shear and cause the loss of a wheel while driving. After proper installation, it�s very important to make sure correct torque is maintained and routinely checked.
Shocks:

SMB offers Rancho Shocks as an upgrade to the Old Man Emu shown here. The suspension system determines what the shocks length, and how it handles the specific loads due to custom valving. I�m not going to claim on being any kind expert on suspension systems, so I�m definitely not the person to comment on what�s the best solution. My conversion came with ARB Old Man Emu series shock absorbers. I�ll say I�m very satisfied with how my 06 handles on asphalt but the ride on washboard type roadways is another story. Some owners have upgraded the suspension and claim a huge benefit from going with different springs and shocks. I plan to at least look into an upgrade in the future. This is something that should be done after you have determined what the total weight of the van is going to be.
Warn Winch:

The Warn winch that fits inside the Aluminess bumper is rated at 12,000 pounds. That�s a little light for some of the SMB�s that can weigh well over 10,000 lbs, but if you use one correctly the idea is to assist you out of a jam not drag you out like you normally would a Jeep. If you try to simply pull yourself out of a bog, you�re probably going to damage the bumper or worse, get yourself hurt. I�m far from being a four wheel drive expert but my 30+ career has involved daily winching and rigging of heavy equipment using rope with common block and tackle or snatch blocks. Capstans with gins are still used but thankfully have been replaced with more modern winches that utilize jibs and booms. One thing that hasn�t changed is the fact that things can and do go wrong from time to time. I can�t stress this enough. It is very important to know your equipment. This includes knowing how to use the equipment, being able to inspect the equipment and know what it�s rated for. Something as simple as handling backlash can get you in a jam. So if you purchase a winch, try to find someone to teach you how to use it correctly. Keep in mind that most articles (and off roaders) do not cover techniques for heavy vehicles. It�s a misunderstood piece of equipment and may in fact be the most dangerous tool on the van. At work I use standard steel rope (cable) that is supplied with most Warn winches. The new braided synthetic ropes are really the way to go nowadays. It�s safer compared to steel cable, and size for size rates stronger as a rule. A steel cable snapping can be dangerous. And that�s just one hazard. Like I said; when things go wrong it�s easy to damage your vehicle or be critically hurt. Not good in the backcountry and it can happen to the most experienced people. A few years back I pulled some guys out of a stuck in the snow situation in the Sierra�s. I had a feeling of how much load I was winching and kept yelling at the kid who was driving to apply some throttle to help out. An older guy with the group pulled his kid away from the bite of the cable. I kind of had to laugh because I was way under the breaking point but how�d he know something wouldn�t go wrong? He erred on the side of safety. It wasn�t long after that I upgraded to Super Pull synthetic rope. It cost me, but I feel better. The rope I choose is twice as strong as the cable of the same size. Recoil is minimal during a break and it�s lighter. I don�t want to scare folks out of the purchase of a winch, just learn how to use it correctly. Here is a link to some basics:
Fairleads and Fairlead Cover:

A fairlead is typically a roller device that supplies a pivot point for a rope cable or rope around part of the vehicle while utilizing a capstan or winch drum. It keeps the cable from dragging across something that can cause damage to the cable and structure while the cable is in motion. In the case of a standard vehicle winch, the fairlead is mounted directly in front of the winch drum. In general, most fairleads do not guide the cable correctly onto the winch drum, rather they protect the cable as it enters the drum. So it�s important to know how to load the cable correctly onto the drum. Read the winch manufactures instruction guide for guidelines on proper operation. Roller fairleads were most common in the past. Roller fairleads give the user the ability to winch from various angles for short or longer distances. With the advent of synthetic ropes, a new design fairlead called a Hawse fairlead was developed.

Hawse fairleads do not have typical rollers and are simply an elongated smooth slot device that the rope pulls across. Debate over which fairlead is better continues. Roller fairleads supply no friction when using synthetic rope but the rope can become pinched if pulled into a corner between the rollers. The Hawse fairlead is fast becoming the choice for use when using synthetic ropes and are being improved to handle the friction the Hawse fairlead can develop. Steel rope requires a roller fairlead but with careful skill and common sense, a synthetic rope can be used with the roller fairlead.

A fairlead cover is nothing but cover that clamps over standard roller fairleads. It�s more of a cosmetic device but does help keep water out when driving at high speeds in wet conditions. Does it keep the winch and rope completely dry? Nope, but it will help with sunlight damage to rope.
Winch Recovery Kits and equipment:
A recovery kit is the odds and ends needed to get you unstuck. I made my own and it might not include all the correct equipment that some kits have but has suited me well. These vans are heavy so extrication methods used can be different than vehicles like Jeeps and small pickups. That also applies to the equipment. One day I would like to take a class on heavy vehicle recovery, but until then I have to rely on what I learn from work and my own field experience.
Here is what I currently carry:
1. Straps and ropes:
Several properly rated nylon straps of various widths, lengths, and types. I�ve had some exposure to off road equipment but am far from being an expert so I will just say research it. There are specialized straps designed for different purposes. Some straps are typically used to wrap around trees but can also be wrapped around any solid anchor point including rocks. If a standard choking strap somehow frees itself under a strain during winching there is less of a chance of becoming a deadly projectile but even a nylon strap can slap you silly. A recovery strap on the other hand is designed to stretch when pulling another vehicle out. They help to transfer momentum energy from the moving vehicle to the stuck vehicle while jerking the stuck rig out. But the winch hook or a shackle itself can become a killer if something breaks or cuts loose at the wrong time. In fact anything the winch is hooked to can become a projectile, including the anchor point. Some types of rope can become a huge rubber band that can add fuel to the fire. Care and proper procedures must be taken with each item used in a recovery situation.
2. Blocks:
Pulley blocks or sometimes called a sheave must also be rated and should never be taken past their rated value. It is very important to understand the physics of using a winch with any type pulley block. There are different types of blocks; the most common off road type being the swing type Pulley block offered by companies like Warn. Snatch blocks are generally gated and can be opened up. These are dangerous because some can open when the load slackens. Avoid these like the plague. Most 4×4 pulley blocks require a shackle to be attached to a strap or chain. Snatch blocks have a place in the winching procedure, just make sure they are rated and used correctly. The use of blocks can be hazardous to your health if not understood or misused. Again, the #1 problem about getting a SMB unstuck is the weight of the vehicle. Many long time true and tested methods for recovery must be reevaluated. You�re not pulling out a little Jeep. Here is a couple good introductions for lightweight vehicles. The first link below is a must read:
3. D Shackles:
A �D??? clevis is similar to or often referred to as a shackle. For the most part shackles and clevis have a pin or bolt that is secured by a cotter key where a �D??? shackle has a pin that is screwed into place. These must also be properly rated. Terminology varies.
4. Chains:
Chains must also be rated for the correct strength before being used. Chains can be a dangerous projectile if they break or become cut loose somehow. Many recovery kits have under rated chains for dealing with a Sprotsmobile. It�s always important to understand that the idea of winching a SMB involves helping to pull you out, not pulling you out.
5. Receiver shackles:
These shackles bolt into standard tow receivers and allow a recovery point to the rear of the vehicle that has no bumper hooks or shackles on the bumper. The weak link is the receiver itself and/or the receiver shackle. These are a poor way to recover a vehicle as heavy as a SMB and extreme care must be taken while rigging off these devices.
6. Recoil blankets:
Laying a leather or rubber blanket over a steel rope can lessen recoil if the cable comes loose under a heavy load somehow. Many times cables break when they pass through the snatch block. The recoil can throw the cable toward the vehicle and the person operating the winch. Ropes or piggin strings (short ropes) attached to the end of cables can also help with recoil. I always keep a rubber blanket on board as it can always be used to lay on while crawling under the van.
7. Gated hooks:
I keep a couple of rated hooks that have spring loaded gates. They have eyelets large enough for the shackle pins.
8. Hammer locks, oval rings and pin chain hooks:
Hammer locks are rated connection devices that allow you to connect oval rings to chains. Pinned chain hooks are standard hooks that allow you to clamp the chain into itself, while chain ovals are rings that allow a chain to be used as a choking device. All of these require knowledge on how to use them and are not standard in most recovery kits. Full rated strengths must be observed for safety purposes.
9. Good set of leather gloves:
Those speak for themselves. Protect your hands.
10. The recovery kit bag:
It�s really just a nice bag to throw all the little things in. Companies like Warn offer complete kits with the basics in one handy bag.
11. Max Tool Kit:

I�ve had one of these for several years and it�s handy. Used by firefighters, this multi ax has basic add on tools such as a shovel, rake and even a pick. Hopefully this is what the SMB options list is talking about.
12. Bottle jack:
A small hydraulic bottle jack can be very useful in the field. Also it�s a good idea to keep a plate of some type that supplies a larger footprint to keep the jack from sinking in soft soils. Here too care must be taken using a bottle jack to lift an axle so you can shove a rock or wood block under a tire. A little common sense goes a long way but when you�re in a predicament, common sense seems to be lacking. Keep your wits together and work safe. It might be a good idea to have the properly rated jack stand on board, but for a heavy van, heavy duty jack stands are huge and difficult to stow.
The last item that I don�t carry but will soon, is the Hi-Lift Jack. This tool should be used as a last resort but can be the only tool available to get you unstuck. This was true on a recent trip I took. It changed my mind about using one of these on a heavy vehicle.
Deflators:
A Bic pen? What do you use to lower the tire pressure when airing down? Reducing tire pressure will soften the ride considerably. This method also makes driving is sand more effective. If you ever sink in sand, many times just lowering the tire pressure will allow you to simply drive out of the trap. Selectable screw on deflators are available that allow you to drive while the tires deflate to a predetermined level. The deflator SMB offers are not those types but are better than a ball point pen. The one I purchased simply opens the valve and allows me to check pressure with a gauge while the air escapes. One thing about deflators is that most selectable models can only drop the tire pressure within a specific zone. An example is one set might be able to drop tire pressures to between 10 and 30 PSI and while there are times I will drop the tires that low, I more typically reduce the tire pressure from say 80 PSI to 40 PSI. So you might need to have more than one set of selectable deflators.
Compressor:
I�ll go over what is on the 2008 option list. Tire compressors are made by several companies but SMB provides the Extreme Air models.

The standard Extreme Aire is a vehicle mounted compressor that has full duty cycle. That is, it can be used continuously until the tires are brought to full pressure. The Magnum series is also full duty but faster. Compressors slow quite a bit when trying to achieve high pressures. The newer E rated tires typically require 80PSI. Speed is nice. Although I�ve never used the Magnum, I can only surmise that it�s a better way to go for E rated tires. The standard Extreme Aire series was the only unit offered by SMB other than the portable compressor during my build.

It�s has worked well but I also had the compressor tank installed. With the tank, certain air tools can be used. It also supplies pressure to the rear air bag system on my van. I paid slightly under 700 dollars (installed) back in 05. Things have gone up. The Magnum comes in at 1,271 (installed) on the 08 price list. God, I wonder how much it costs now after installation? The portable costs around 500 bucks. I would suggest researching off road compressors. There are some really nice ones out there.
Billet Grill:

I had to have this option. IMO it made the vehicle look like I wanted it to. It also helps to protect the radiator from being hammered by rocks that oncoming vehicles can kick up.
Bug Defector:
Well, not for me but they do work somewhat. These are those plastic devices that sit on the front hood and basically re-direct oncoming air as well as the bugs upward causing them to miss the windshield. I�m more worried about the bugs that get into the radiator than the windshield. On long trips I always look for a car wash to keep the radiator clear of insects. If the windshield has been hammered, it�s time to clean the radiator as well. I haven�t seen the model SMB offers, so I don�t know how stylish it looks.
Hood Mast (Bra):

This was another item I thought made my van look better. It�s a personal view and what one likes; others might not. That�s cool, we are all different. At least SMB doesn�t call it a hood protector. A bra actually does more damage than good. Dirt, sand, and other debris get under the mask and cause all kinds of damage. Once one is installed, you might as well leave it on! Because Ford made design changes from the older vans, I might even consider purchasing an extra for the future.
Bushwacker Fender flairs:

This was also something I had to have. Flairs keep you in compliance with the law concerning wide tires provided you don�t go too wide. Without flairs you might have to install mud flaps as an alternative. Similar to the bra, flairs have a tendency to accumulate dirt and sand that can eat away at the bodies paint. I�ll live with that. That�s why there are paint and body shops in the world. Nothing lasts forever.
Wheels and tires:

At the time of my order there weren�t too many options out which addressed vehicles pushing 12K lbs. I went with the standard American 16 inch Mag wheel with 285 R16 BF Goodrich AT �D??? rated tire. A �D??? rated tire is the wrong choice for a loaded SMB van as heavy as mine. Although I never had any problems, as soon at an �E??? rated tire came out I jumped on it. No sense having a blowout and loosing the van. Besides, �E??? rated tires have a stronger side wall rating and when airing down this is crucial. I�m sure tire designs and ratings will improve in the future. Opinions on who makes the best tire, (or rim for that matter), is a personal choice.

I will not argue manufactures here. These rims shown here look great IMO. The main thing is to be sure that the wheel and tire can take the weight of the rig. Make sure a high quality valve stem is installed. Rubberized metal valve stem are better than solid metal types IMO. If a rock hits them they will give slightly which is a definite advantage when off road. Another factor is just how large of tire/rim you can or should go. Larger tires and rims give better ground clearance but may rub the fender wells on tight turns and can cause damage to Bushwacker fender flares if you have them. If you�re stranded in remote spot, will you be able to find a new setup? A little research can go far here. Larger tires and rims also make it more difficult to climb into the van and will also change the gear ratio of the drive train. You should decide what you need before the differential gear ratio is installed or ordered. One more item to throw in is tire chains. If the tires rub without chains on, you might cause damage when chained up so that has to be taken into consideration sizing the tires. As far as snow chains go, Rud chains are some of the best and also costly. Although most chains will fit a variety of tire sizes, it can hurt the pocketbook if you purchase chains then switch to a tire size that�s radically different. I carry two sets of Pewag chains which are above standard as far as quality is concerned. Another device that is of value is the Hi-Lift Jack. On a recent off road run, one of the members was high centered on a rock. The only thing that saved him from a costly tow was the ability to use his Hi Lift Jack. He had the adaptor that fit into the American wheel to get him out. I was glad to see it in operation. I now plan to install a Hi Lift Jack on my vehicle and know it will work with my rims.
Custom Audio/Video:
Rob and Randy do fantastic work at SMB. It can be expensive but they know what they are doing. Of course there are stereo shops all over the place and it might be an advantage dealing with locals. Rob and Randy also handle the alarm portion of the build as well. Randy has pulled me out of the fire on more than one occasion. He has found problems that other companies have made and preformed the necessary repairs. I�m glad he caught the problem. I originally kept the stock radio/CD player but finally switched to a Kenwood player. It has a Bluetooth feature but I find it not up to par with a stand alone system such as the �Parrot???. But the Kenwood is a cleaner install and being it interfaces with my I-Pod, I�m very happy with it. I also run Sirius radio. Many times I�m unaccompanied on my journeys and just listening to the Sirius DJ�s keeps me feeling less alone. It does make a big difference to me. A drawback to some electronic systems is they can be power hogs. One item to note is that nice sound systems usually require subwoofers, upgraded speakers, and additional amplifiers. When sitting idle in camp, an amplifier can suck up precious DC current. Another large DC drawing item is a flat screen TV. I�m holding out on the TV until the price drops on them as these HDTV�s become more available. Looking at sites that offer items for truck drivers might bring some light to 12 VDC brands that could work well in a SMB. As Blu-Ray and laptops with multi media properties become more and more the rage, spending big bucks on an in-house system that will be outdated within a few years might not be a good move. I�m certainly gonna think before I jump. Again, this is going to be a personal choice. Direct TV in a van? While some may say �I�m trying to get away from that!??? I can see myself watching a good football game in the hills rather than on the chesterfield at homeJ.
AMSOIL:
Pick the fluids you believe in. But even if don�t believe in synthetics, a duel oil filter system could be a good choice, especially for diesels. Many mechanics say not to tinker with design. Here again is something to argue which I will refuse to do in this section.
ARB Lockers:
Here is another highly debated topic. Best to just read this:
The ARB lockers are an air activated device. Some of the earlier models had problems with leaks preventing them from engaging. It seems most of the bugs have been worked our, and at least mine hasn�t failed me. Whether you go with one on the front axle or the rear axle has been an interesting thread in many forums. Most people are not aware how heavy these vans are and how the locker works on a heavy vehicle is much different than how they work on something like a Jeep. I only have a front locker, so I can�t compare it to one installed in the rear differential. I can say that the front locker has pulled me up some difficult spots and although a rear locker might have been able to do the same job, I have a feeling that the front would have had a tendency to spin one tire causing the vehicle to shift sideways. But I can�t confirm this. In a real world I probably should have had them installed front and rear.
Limited slip up front is another highly debated issue. At this point in time I have limited slip in the rear axle. I just don�t know what how it would perform up front with the steering. You would still have the ability to un-lock the hub and create something similar to standard FWD I would think. This is better explained by the experts even though they can also be wrong. The pros that deal with heavy off road vans would be the ones to seek out. One thing nice about an ARB air locker up front is the ability to engage or disengage the locker with the push of a button. This allows you to open the axle so you can steer the vehicle in a turn, then re-engage it for better traction. Adding an air locker to the rear would be an added expense for me now and I wish it had been done at the build of my rig. I would have saved on the initial cost of the limited slip carrier and paid only 1500 more dollars on the air locker. I doubt I will ever change over unless someone can show me it�s worth it.
Dynatrac Full Floating Axle:
I definitely plopped down the 3500 bucks for the full floating axle. I knew my van was going to be heavy and I wanted all the support this axle would give.
It only makes sense to go this route if you plan to do much off roading or lightweight rock climbing with a 1 ton vehicle. I�m glad I purchased this option.
The final post:
This is the end of SMB�s 2005 list. Part 14 will be about some of the newer options and specialized equipment I have added to my van. This section will be revised from time to time as I upgrade my van which seems to be never ending. Thanks for following autoramblings.com. Be sure to check out my off road web site as well autoramblings.com/sportsmobile/
The site is in progress but offers some spots to see in my local area and the site will be expanding as time goes on.
See Ya On The Trail.
Dave Boyer.
I rarely leave responses, however i did a few searching
and wound up here Auto Ramblings – Get Your Auto News Here!
? Blog Archive ? Sportsmobile, Not Your Standard RV � Part 13.
And I do have a couple of questions for you if you usually do not mind.
Is it simply me or does it look as if like a few of these responses look like they are coming from brain dead people?
😛 And, if you are writing on additional places, I would like to keep up with anything
fresh you have to post. Could you list of the complete
urls of your shared pages like your linkedin profile, Facebook page or twitter feed?
(not to be published)
Dear Mr. Boyer,
I’m a Swiss foreign correspondent getting ready for a new life aboard an E350EB 4WD. Throughout my planning, your SMB-series was most valuable to me. It saved my a lot of time and provided information I otherwise would probably never come across. Often you pointed out that many others would surely disagree with your point of view about certain issues. Of course, people have different lifestyles and expectations. But there is hardly anything where I would differ. That’s why your series has been specially valuable for me. When I’m not sure about something, I look up at autoramblings for your advise.
I just want to thank you for all the work you put into this excellent articles. They are informatiive, to the point, well argued and make good reading on top. I’ve read them all several times over the past year. But still, sometimes I come back to autoramblings (just as I did now) to check if you’ve added a new chapter…
All the best to you!
Thomas Diethelm